


Fill Profile Information
Fill Profile Information is used to edit profile's basic information such as Sex, Birthday, Interested In and About Me items. It makes multiple accounts' profile information revision possible and enables the accounts to be more real and personalized.
1. 1. Click Facebook -> Fill Profile Information
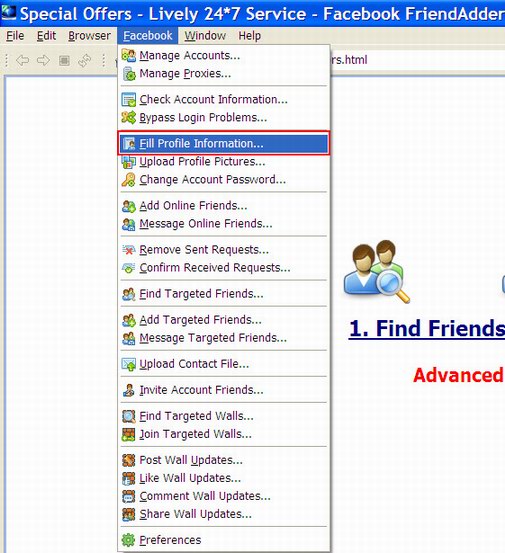
The following is the interface of the feature:
2. Account
The purpose of the Account field in the Fill Profile Information feature is to choose account(s) which you want to modify. You can select a specific account or campaign to run this feature. Here is a screenshot of this field:

Usage
There are 4 kinds of options in the combo box. You can open the drop-down menu and select one option as you need.
Example
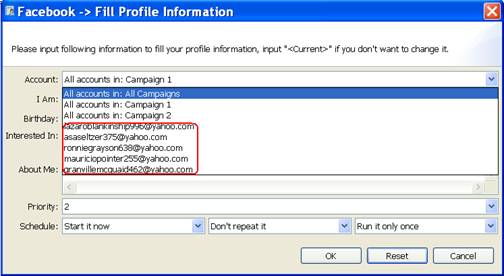
1) All accounts in: All Campaigns:
With this setting, the expected running result is as follows:
- All accounts in the program will run this feature.
- The program will start all accounts listed in the program sequentially, from the first account
to the last one.
2) All accounts in: One Campaign:

With this setting, the expected running result is as follows:
- All accounts in the specific campaign will run this feature.
- The program will start the accounts listed in the program sequentially, from the first account
to the last one.
3) Select a specific account:

With this setting, the expected running result is as follows:
- Only the selected account will run this feature.
4) All accounts in: Selected Accounts:

This setting only appears when you select your targeted account(s) in Manage Accounts window and click Start To button on the left to run a certain feature.
With this setting, the expected running result is as follows:
- Only the selected account(s) will run this feature.
- If you select several accounts, the program will start selected accounts listed in Manage
Accounts window sequentially, from the first account to the last one.
Notice
1) If there isn't any account in Manage Accounts window, the drop-down menu will appear blank in
the combo box; :

2) If you have hidden several accounts, these accounts will not be shown in the combo box;
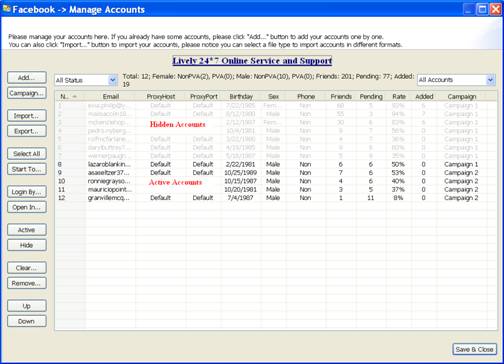
3) If you hide several accounts a specific campaign, then start running accounts in this campaign, these hidden accounts will not run the feature.


3. I Am
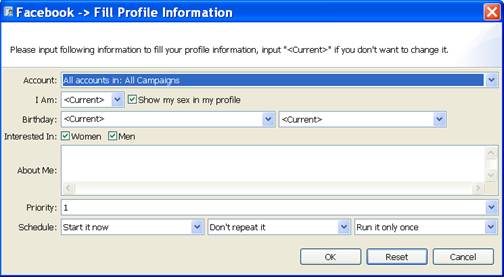
The purpose of I Am field in the Fill Profile Information feature is to set the gender for the account(s). And the option Show my sex in my profile can be used to make the account's gender setting visible or invisible in the account profile information. Here is a screenshot of this field.

Usage
There are 3 options to choose after you click the I Am combo button. Please choose one option to run.
Example
1) Current
With this setting, the program will keep the account's gender as current.
2) Male

With this setting, the program will change the account's gender to Male.
3) Female

With this setting, the program will change the account's gender to Female.
4. Birthday
The purpose of Birthday field in the Fill Profile Information feature is to set the birthday for the account(s). Here is a screenshot of this field.

Usage
There are 2 options to choose after you click the Birthday combo button. Please choose one option to run.
Example
1) Current
With this setting, the program will keep the account's current birthday.
2) <RandomMonth>/<RandomDay>/<RandomYear>

With this setting, the program will set random birthday for the account(s) according to the format.
It also supports the fixed month, day or year setting.
For example, <RandomMonth>/< RandomDay >/1987 stands for the fixed year, random month and day; 6/<RandomDay>/<RandomYear> stands for the fixed month, random year and day. You can also input a specific birthday according to your own need
In addition, the privacy setting of the birthday is available. There are four options available to set how to display the birthday information in the profile.

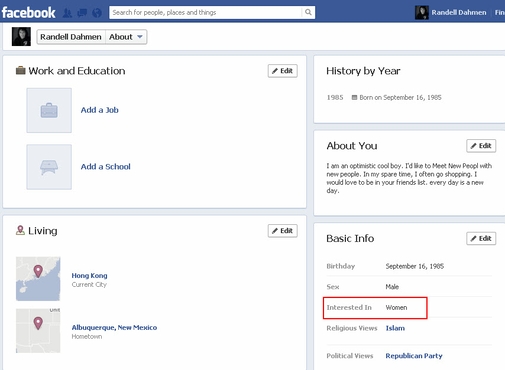
5. Interested In
The purpose of Interested In field in the Fill Profile Information feature is to set which gender the account(s) is interested in. Here is a screenshot of this field.

Usage
There are 2 options to choose for the account's Intersted In.You can choose one or both.
Example
1) Women

With this setting, the result can be expected as follows:
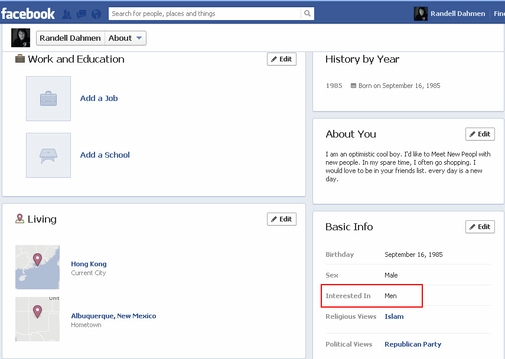
2) Men

With this setting, the result can be expected as follows:
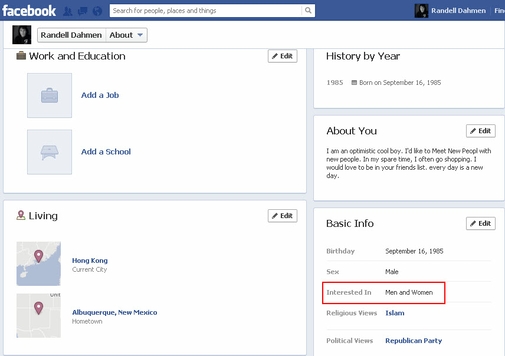
3) Women & Men

With this setting, the result can be expected as follows:
6. About Me
The purpose of About Me field in the Fill Profile Information feature is to set the specific description for the account's profile.
Usage
The program supports the following format:
1) Keep default setting: <current>, without making changes for the option
2) Edit particular messages(one per line)
3) Use spun messages format to create random messages. eg: {keyword1|keyword2|keyword3}
Example
1) Keep default setting: <current>

With this setting, the program will keep the account's previous description in About me.
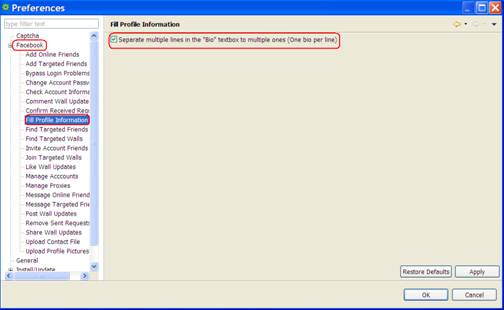
2) Edit particular messages(one per line)

Go to Preference --->Fill Profile Information, tick the option 'Separate multiple lines in the "Bio" textbox to multiple ones (One bio per line)'.
With this setting, the program will select one of descriptions randomly.
3) Use spun messages format to create random descriptions.

With this setting, the program will create the following 3 descriptions:
a friendly girl/ a cute girl/ a lovely girl
7. Priority
The purpose of the Priority field in the Fill Profile Information feature is to make all accounts in the program work more effectively for you. It has two functions. One is to decide which account or campaign to work prior. The other one is to decide how many accounts in the selected accounts or campaign to run a feature at the same time. Here is a screenshot of this field:

Usage
There is a read-only combo in this field. When starting an account or campaign to work, you can decide the speed and priority by setting up the priority field.
Exampe
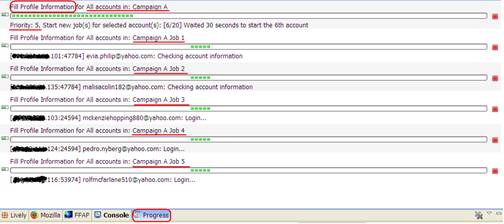
1) Start an action by this feature at priority 5:


- Campaign: Campaign A
- Accounts: 20 Accounts
- Priority: 5
With this setting, the result can be expected as follows:
- The program will start 5 accounts of Campaign A to work at the same time. The left 15
accounts are waiting. - When any account of previous 5 finishes the work, the left of the other 15 accounts will
take up the thread to work immediately.
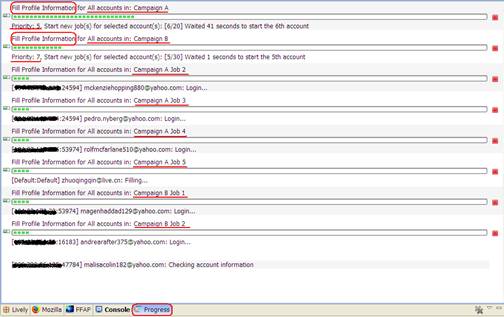
2) Start a new action by this feature at priority 7:


- Campaign: Campaign B
- Accounts: 30 Accounts
- Priority: 7
With this setting, the result can be expected as follows:
- The program will only start 2 accounts of campaign B to work at first, because there are already 5 accounts of campaign A working.
- When any account of campaign A finishes work, accounts of campaign B will take up the thread to work immediately.
- The left accounts of campaign A have to wait until all accounts of campaign B finish sending messages..
- There are 7 accounts of campaign B working at the same time.
- The left accounts of campaign A will continue to work when there are less than 5 accounts of campaign B working.
Notice
1) The field can be used in different features for different campaigns.
2) Don't set two campaigns at the same priority, or the accounts of the two campaigns will be mixed up to work.
3) Bigger priority is often used for urgent work in case it is need to be done urgently. So priority 10 is often kept free.
8. Schedule
The purpose of the Schedule field in the Fill Profile Information feature is to make the program work full automatically for you. You can set and forget the program by using this field properly. Here is a screenshot of this field:

Usage
There are 3 read-only combos in this field. The first one is used to set a start time which controls when to start a new action by this feature; the second one is used to set a repeat period which controls how long to repeat running the new action; and the last one is used to set a repeat times which controls how many times to repeat running the new action. You can click on each of these 3 combos to open a drop down menu and select an option as you need.
Exampe
1) Start a new action by this feature immediately:

- Start Time: Start it now
- Repeat Period: Don't repeat it
- Repeat Times: Run it only once
With this setting, the result can be expected as follows:
- The program will start a new action by this feature immediately.
- The new action will start new jobs for all your selected accounts.
- The program will stop this new action after it started new jobs for all your selected accounts.
2) Start a new action by this feature at a certain time:

- Start Time: Start it 24 hours later
- Repeat Period: Don't repeat it
- Repeat Times: Run it only once
With this setting, the result can be expected as follows:
- The program will start a new action by this feature at 24 hours later.
- The new action will start new jobs for all your selected accounts.
- The program will stop this new action after it started new jobs for all your selected accounts.
3) Start a new action by this feature at a certain time and repeat this action multiple times with a certain period:

- Start Time: Start it 10 minutes later
- Repeat Period: Repeat it every 24 hours
- Repeat Times: Run it 7 times
With this setting, the result can be expected as follows:
- The program will start a new action by this feature at 10 minutes later.
- The new action will start new jobs for all your selected accounts.
- For every 24 hours in the follows 6 days, the new action will start a new job for all your selected accounts full automatically.
- The program will stop this new action after it started new jobs for all your selected accounts for the 7th time.
Notice
1) The Start Time setting doesn't affect the action since the second time running when you are trying repeat it multiple times;
2) The Repeat Period should better to be longer than the time which the new action needed to start new jobs for all your selected accounts;
3) When you are choosing "Don't Repeat it" for the repeat period, then no matter which option selected for the repeat times, the new action will work without repetition.
4) When you are choosing "Run it only once" for the repeat times, then no matter which option selected for the repeat period, the new action will work without repetition.


livelyservice.com is not affiliated with Facebook. By purchasing our serivce you agree to abide by Facebook's Terms of Service.