


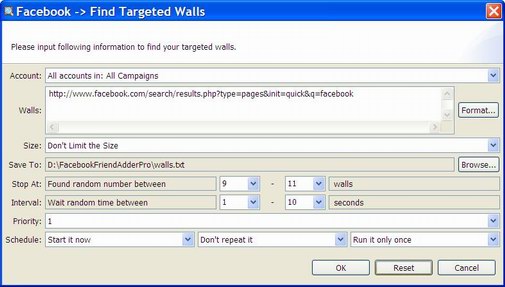
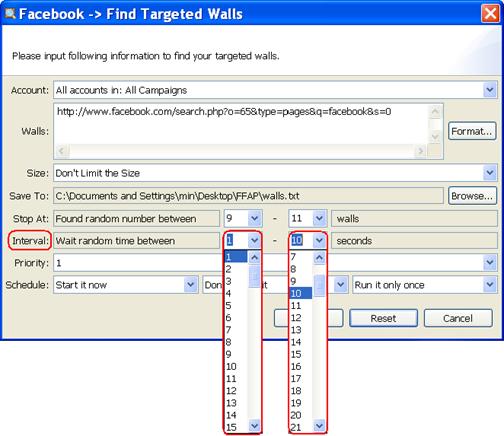
Find Targeted Walls
Find Targeted Walls is used to gather thousands of unique targeted walls within few minutes. The most powerful advantages of it are fast and unique. Turn to the software, find this feature as follow:
1. Click Facebook -> Find Targeted Walls
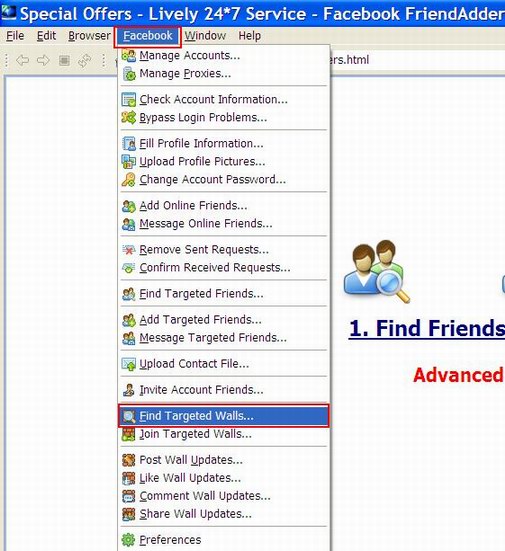
The following is the interface of the feature:
2. Accounts
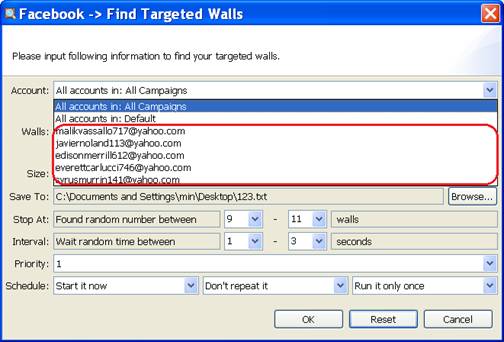
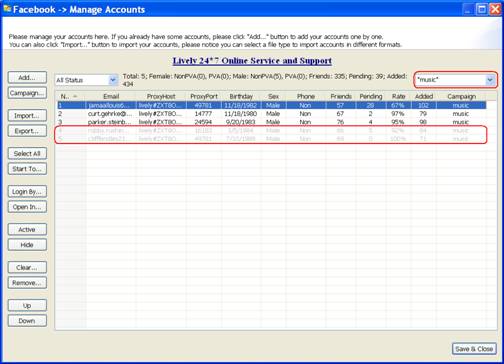
The purpose of the Account field in the Find Targeted Walls feature is to choose account(s) which you want to find walls to. You can select a specific account or campaign to run this feature. Here is a screenshot of this field:

Usage
There are 4 kinds of options in the combo box. You can open the drop-down menu and select one option as you need.
Example
1) All accounts in: All Campaigns:

With this setting, the expected running result is as follows:
- All accounts in the program will run this feature.
- The program will start all accounts listed in the program sequentially, from the first account
to the last one.
2) All accounts in: One Campaign:

With this setting, the expected running result is as follows:
- All accounts in the specific campaign will run this feature.
- The program will start the accounts listed in the program sequentially, from the first account
to the last one.
3) Select a specific account:

With this setting, the expected running result is as follows:
- Only the selected account will run this feature.
4) All accounts in: Selected Accounts:

This setting only appears when you select your targeted account(s) in Manage Accounts window and click Start To button on the left to run a certain feature.
With this setting, the expected running result is as follows:
- Only the selected account(s) will run this feature.
- If you select several accounts, the program will start selected accounts listed in Manage
Accounts window sequentially, from the first account to the last one.
Notice
1) If there isn't any account in Manage Accounts window, the drop-down menu will appear blank in
the combo box; :

2) If you have hidden several accounts, these accounts will not be shown in the combo box;
3) If you start running a specific campaign, then hide several accounts in this campaign, these hidden accounts will not run the feature.

3. Walls
The purpose of the Walls field in the Find Targeted Walls feature is to choose what kind of target walls to search for.

Usage
There are two options to choose from after you click the Format button.
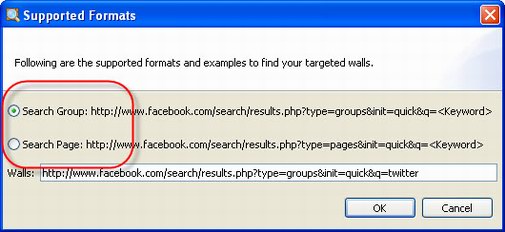
Through the setting there, you can find targeted group or page's walls by some certain keyword.
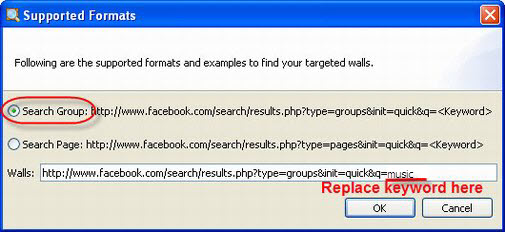
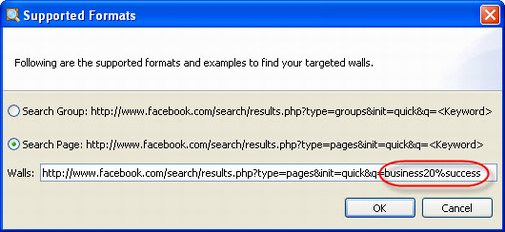
1) Search Group: search group's walls by some certain keywords
- If you have only one keyword, please replace it as follows:
- If you have two keywords, such as businessman and success, please connect them with %20 or space and replace it as follows:
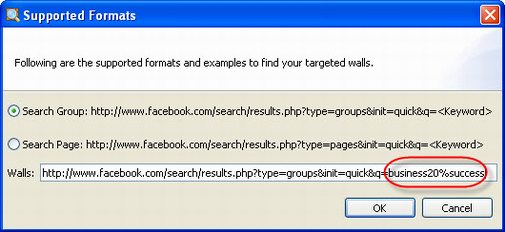
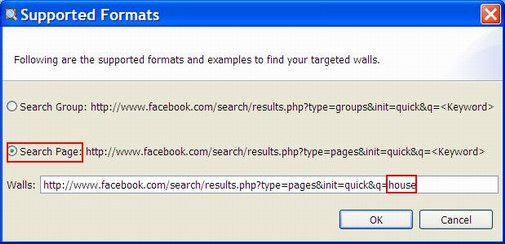
2) Search Page: search page's walls by some certain keywords
- If you have only one keyword, please replace it as follows:

- If you have two keywords, such as businessman and success, please connect them with %20 or space and replace it as follows:
Principle
It would take us a lot time and energy to login the account by browser manually to find target walls one by one. However, with the setting in this field, we can find targeted walls efficiently by some certain keyword.
Example
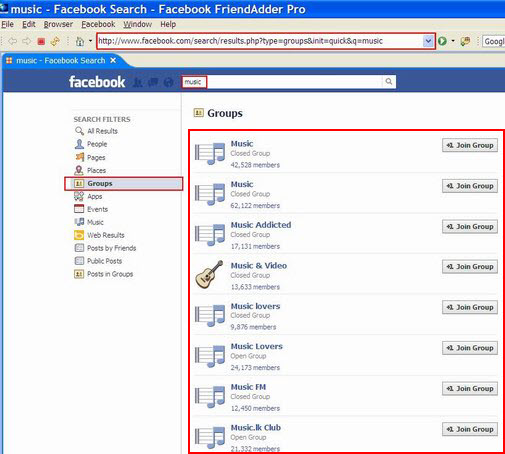
1) Search Group: Find group's walls by a certain keyword
With the setting here, it will gather group's walls from the page searched by the keywords.
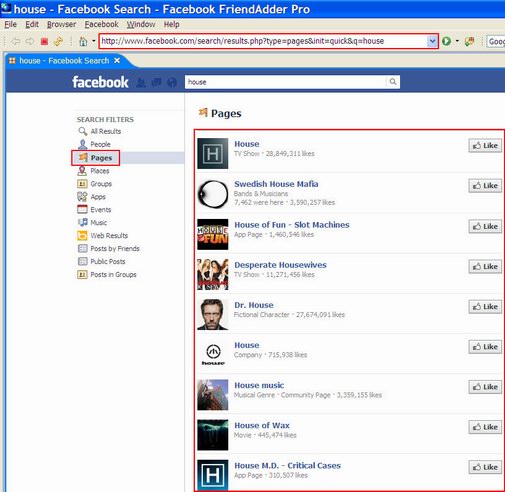
2) Search Page: Find page's walls by a certain keyword.
After running with the setting, it will gather page's walls from the page searched by the keyword.
Notice
1) If there are many accounts running, the program won't search the same link twice among all accounts;
2) When you use two or more keywords to search walls, please use %20 or blank to connect the words;
4.Size
The purpose of the Size field in the Find Targeted Walls feature is to limit how many members/fans in the group/page you want to find. You can filter the group/page by the number of its members/fans. Here is a screenshot of this field:

Usage
There is 1 read-only combo in this field. You can select Don't limit the size or Limit at least a certain members or fans. Please click on the combo to open a drop down menu and select an option as you need.
Example
1) Don't limit the size

- Size: Don't limit the size
With this setting, the expected running result is as follows:
- The program will save all the group/page no matter how many members/fans are.
2) Limit the size at a certain members/fans:
- Size: Limit at least 5000 members or fans
With this setting, the expected running result is as follows:
- The program will filter the group/page with 5000 more members/fans.
5. Save To
The purpose of the Save To field in the Find Targeted Walls feature is to save the walls' URLs of group/page to the customized folder in one text file. Here is a screenshot of this field:

Usage
Here're editable fields with choosing specific folder by clicking Browse button. And then windows pop up. The screenshot of the windows as below:
Example
Start a new action by using Find Target Walls:

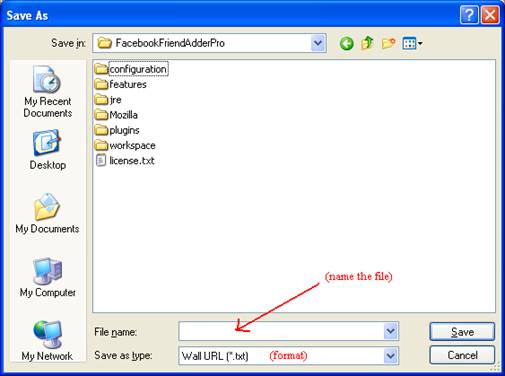
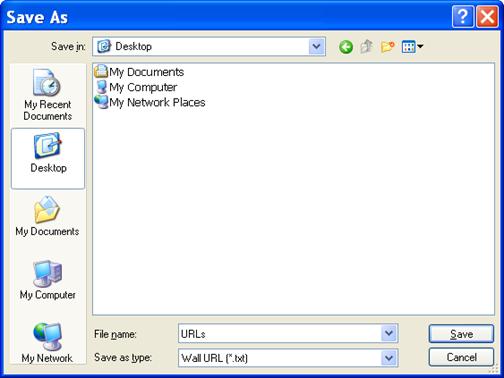
- Click Browse to save the file to desktop as the image shows below and entitle it "URLs"
With this setting, the expected running result is as following:
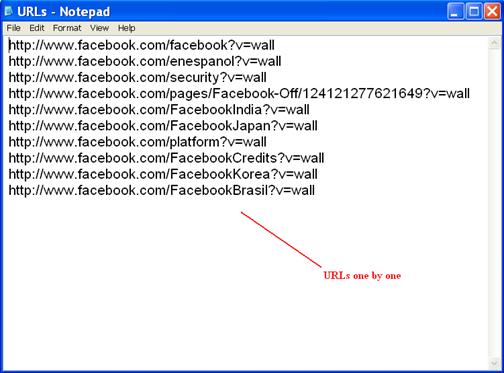
- The URLs should be sorted the text file as below:
Notice
1) You'd better choose one folder you want to save the file in so that you can use it anytime conveniently.
2) Because it has max limit number for saving the URLs in text file, so if you want to gather more URLs, you have to use the feature several times and save them to the same file.
6. Stop At
The purpose of the Stop At field in the Find Targeted Walls feature is to control how many walls the program searched for you. It is an important field for the feature. Here is a screenshot of this field:

Usage
There are 2 combos in this field. You can choose or input manually the number in the combo. The latter number should be not less than the former one.
Example
1) Input the number manually:

- The former: 110
- The latter: 250
With this setting, the expected running result is as follows:
- The job will find a random number of walls between 110 and 250.
2) Input the equal number in two blanks:

- The former: 50
- The latter: 50
With this setting, the expected running result is as follows:
- The job will find 50 walls
Notice
1) Two numbers in this field should not be negative number.
2) The latter number should be not less than the former one.
7. Interval
The purpose of the interval field in the Find Targeted Walls feature is to control the time interval when the account will start to do next action after the former action finished. It is an important field to keep account from suspected by Facebook if the account runs too fast. Here is the screenshot of this field:
Usage
There are two combo boxes in this field. You can choose or input manually the number in the combo. The former number should not be larger than the latter one.
Example
1) Choose random number:

- The former number: 1 second
- The latter number: 10 seconds
With this setting, the expected running result is as follows:
- It will start to do next action in a random time between 1 and 10 seconds after the former action finished.

2) Input the same number in the combo box:

- The former number:10 second
- The latter number: 10 seconds
With this setting, the expected running result is as follows:
- It will start to do next action in 10 seconds after the former action finished.

Notice
1) Two numbers in this field should not be negative number.
2) The latter number should be not less than the former one.
8. Priority
The purpose of the Priority field in the Find Targeted Walls feature is to make all accounts in the program work more effectively for you. It has two functions. One is to decide which account or campaign to work prior to other accounts or campaigns. The other one is to decide how many accounts in the selected accounts or campaign to run a feature at the same time. Here is a screenshot of this field:

Usage
There is a read-only combo in this field. When starting an account or campaign to work, you can decide the speed and priority by setting up the priority field.
Example
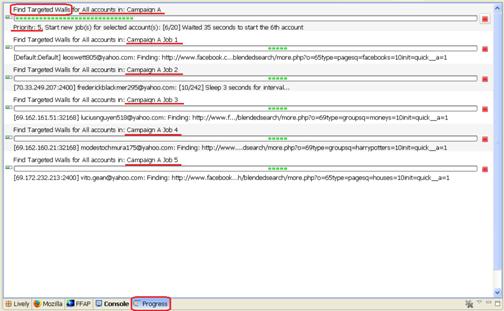
1) Start an action by this feature at priority 5:


- Campaign: Campaign A
- Accounts: 20 Accounts
- Priority: 5
With this setting, the result can be expected as follows:
- The program will start 5 accounts of Campaign A to work at the same time. The left 15
accounts are waiting. - When any account of previous 5 finishes the work, the left of the other 15 accounts will
take up the thread to work immediately.
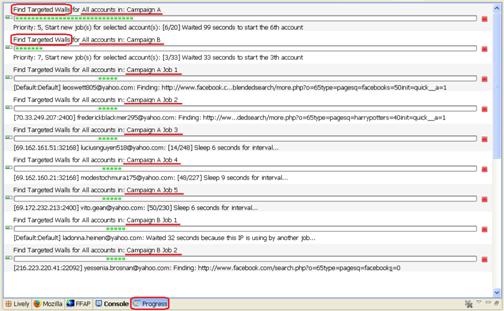
2) Start a new action by this feature at priority 7:


- Campaign: Campaign B
- Accounts: 30 Accounts
- Priority: 7
With this setting, the result can be expected as follows:
- The program will only start 2 accounts of campaign B to work at first, because there are already 5 accounts of campaign A working.
- When any account of campaign A finishes work, accounts of campaign B will take up the thread to work immediately.
- The left accounts of campaign A have to wait until all accounts of campaign B finish sending messages.
- There are 7 accounts of campaign B working at the same time.
- The left accounts of campaign A will continue to work when there are less than 5 accounts of campaign B working.
Notie
1) The field can be used in different features for different campaigns
2) Don't set two campaigns at the same priority, or the accounts of the two campaigns will be mixed up to work.
3) Bigger priority is often used for urgent work in case it is need to be done urgently. So priority 10 is often kept free.
9. Schedule
The purpose of the Schedule field in the Find Targeted Walls feature is to make the program work full automatically for you. You can set and forget the program by using this field properly. Here is a screenshot of this field:

Usage
There are 3 read-only combos in this field. The first one is used to set a start time which controls when to start a new action by this feature; the second one is used to set a repeat period which controls how long to repeat running the new action; and the last one is used to set a repeat times which controls how many times to repeat running the new action. You can click on each of these 3 combos to open a drop down menu and select an option as you need.
Example
1) Start a new action by this feature immediately: ;

- Start Time: Start it now
- Repeat Period: Don't repeat it
- Repeat Times: Run it only once
With this setting, the result can be expected as follows:
- The program will start a new action by this feature immediately.
- The new action will start new jobs for all your selected accounts.
- The program will stop this new action after it started new jobs for all your selected accounts.
2) Start a new action by this feature at a certain time: :

- Start Time: Start it 24 hours later
- Repeat Period: Don't repeat it
- Repeat Times: Run it only once
With this setting,the expected running result is as follows:
- The program will start a new action by this feature at 24 hours later.
- The new action will start new jobs for all your selected accounts.
- The program will stop this new action after it started new jobs for all your selected accounts.
3) Start a new action by this feature at a certain time and repeat this action multiple times with a certain period:

- Start Time:Start it 10 minutes later
- Repeat Period: Repeat it every 24 hours
- Repeat Times: Run it 7 times
With this setting,the expected running result is as follows:
- The program will start a new action by this featureat 10 minutes later..
- The new action will start new jobs for all your selected accounts.
- For every 24 hours in the follows 6 days, the new action will start a new job for all your selected accounts full automatically.
- The program will stop this new action after it started new jobs for all your selected accounts for the 7th time.
Notice
1) The Start Time setting doesn't affect the action since the second time running when you are trying repeat it multiple times;
2) The Repeat Period should better to be longer than the time which the new action needed to start new jobs for all your selected accounts;
3) When you are choosing "Don't Repeat it" for the repeat period, then no matter which option selected for the repeat times, the new action will work without repetition.
4) When you are choosing "Run it only once" for the repeat times, then no matter which option selected for the repeat period, the new action will work without repetition.


livelyservice.com is not affiliated with Facebook. By purchasing our serivce you agree to abide by Facebook's Terms of Service.